|
The honeycomb is constructed of hexagonal cells made of beeswax and has two purposes: to store food (honey and pollen) and as a nursery for new bees.
To produce one pound of wax the bees need to consume about six to ten pounds of honey. The beeswax is secreted by glands on the bee's abdomen. The bees removes the flakes of wax and mold it into shape using its mandibles.
When a cell is used for raising brood, the cell is always left with some cocoon debris from the pupa stage of development. This debris makes the comb appear to be dark, but the wax itself is not significantly affected. When the cell is cleaned after each generation of brood, the cell walls are coated with a secretion called propolis which also contributes to the darkening of the comb.
When a cell is used for only for honey storage, the color of the comb remains bright and cells full of honey are capped with fresh beeswax. Cells used to store pollen can be stained by the colors of the pollen.
The bees will usually alternately use combs for brood rearing or food storage. A comb often will be used for both purposes simultaneously. You can get an idea of how all this looks by going to my webpage at www.three-peaks.net/bee_life.htm.
Usually, when honey is harvested, the wax caps are shaved off with a hot knife, then the honey is removed from the comb by centrifugal force. The empty comb can then be replaced into the hive to be refilled. The wax caps removed in this harvesting process are salvaged. Likewise, when a comb is damaged, the beekeeper will salvage that wax as well. This salvaged wax is often a mess with dead bees, some honey, pollen, cocoon debris, other insects, and maybe even a mouse or two.
This mess needs to be purified in order to obtain usable wax. But, we want to do so in a way that is safe and which preserves all the qualities given to it by nature including aroma, color, texture, strength, etc.
Beeswax melts at about 64C (147F). To preserve the aroma of fresh wax it should never be raised more than a few degrees above the melting point and then only for a short period. I like to melt beeswax at about 155F-160F. If cooled quickly it will become pale in color, more brittle and liable to develop cracks due to rapid contraction. For this reason, wax should be cooled as slowly as possible to preserve the texture and color.
Never place a pan of wax directly on a stove. Beeswax can easily become damaged by localized overheating and if it ignites can burn ferociously. Beeswax does not boil - it just gets hotter and hotter until it ignites.
Perhaps the most common method of rendering beeswax is to use a water-bath (double-boiler) by placing the container of wax - probably a small saucepan - inside a larger pan of water. Wax is best melted in stainless steel, plastic, or tin-plated containers. I use an old stainless steel pot (about 3-gallon size) purchased at a local thrift store. Iron rust and containers of galvanized iron, brass, aluminum, and copper all
darken beeswax.
I use an alternative to the water-bath process just described. This process uses only one pot. In my 3-gallon pot I pour about a gallon hot water, then add the old combs and wax cappings. Maintain heat at 155F-160F until the melted wax and most of the debris are floating on top of the water. Here's a caution with the wax-directly-in-the-water method: if you let the water boil, you darken the wax and otherwise degrade its quality, have water bubbles mixed in your wax, and the bubbling water will spatter wax around the stove.
Once the wax has melted, some of the debris will float on top of the wax; some of the debris will be at the boundary between the water and the wax; and some debris will settle to the bottom of the water. Skim off the debris that floats on top of the wax, then let the wax cool slowly. Once it has solidified, you can remove the wax cake from the pot. You'll find that there will be a layer of debris on the bottom of the cake that will need to be scrapped off. You'll lose some wax in this debris-scraping process, but what is left will be ready to use as bullet lube, candles, bowstring wax, etc. If you've used my wax-directly-in-the-water method, you'll find this scrapping step quite a bit easier and with less wasted wax than with the double-boiler method. The wax-soaked debris makes a good fire-starter or material for the compost pile. The dirty water is even good for the lawn or garden (after it cools, of course).
Here's a labor-saving variation of the wax-directly-in-the-water method: Put your combs and cappings in a suitably sized bag of coarse material such as burlap. Add a brick or rock so you can keep the entire bag submerged below the water level. When you heat the water, the wax will melt and flow through the bag while the debris is trapped inside. The clean wax will float to the top -- and no skimming required! When you you've rendered all the wax, cool the pot slowly until the wax solidifies. It will likely need no further cleaning. However, don't squeeze or poke the bag in an effort to coax more wax out of the bag -- this will only dislodge debris particles which will contaminate your carefully cleaned wax.
The bag can be cut up and used as smoker fuel or to start your fireplace. A
really clever way (and my favorite) to melt down old combs and cappings is to
use solar power. This method is not very efficient for old comb and is mainly used for melting down cappings or new comb. Several designs are available on the Internet. Here are a couple of representative plans:
|
Right-click on the desired image to download
full-sized file. |
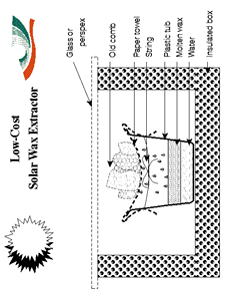
 This solar wax melter is made
from an inexpensive Styrofoam ice chest. I suggest painting the interior
black to increase heat absorption.
Put an inch or two of water in the
plastic tub, then cover with a well-secured filter. The diagram suggests
a paper towel.
Place the plastic tub in the ice chest. Place your wax
waste on the filter material. Cover with your glass or Plexiglas.
Let it
sit in the sun on a sunny summer day The was will melt through the
filter into the water. The water will be warm enough to keep the wax
liquefied until the sun sets when the wax will solidify.
Whatever
impurities pass through the filter will usually settle to the bottom of
the water, leaving clean, pure wax floating on top.
Don't discard the
paper towel -- use it to start your smoker or fireplace. |
 This is a more
sophisticated melter and requires some basic woodworking skills and tools and
maybe some metalworking. It can be made much larger than the ice-chest melter on the left.
For the metal pan, you might try using a large cake
pan or a cookie sheet.
Although the plans don't say to, I suggest using
a filter and water in the collecting tub as described for the ice-chest
melter on the left. |
Back to Ol' Buffalo Beekeeping Page |


